Showing posts with label blogger. Show all posts
Showing posts with label blogger. Show all posts
Sunday, January 8, 2017
Optimise Blogger H1 Tags Best Search Results and SEO
Optimise Blogger H1 Tags Best Search Results and SEO
 |
| Optimised Blog Headers Tags? |
Out of the box, blogger.com templates and themes comes with dedicated H tags (Headers Tags) for its blog posts and blog static pages. A blogger static page would be your "Home" page, "About Us" page or maybe your "Contact Me" page.
A header tag are indicators for the importance of a page structure which is; H1 would be your Post Title, H2 tags dedicated for your posts descriptions or sub titles and so forth.
For Blogger themes and templates, the H1 tags is dedicated for your blog title and H2 tags would be for your blog posts titles. For search engine optimisation, to make your blog posts more relevant to search engines, it is recommended to change your blog posts titles to H1 tags. Thus will prevent duplications of post to blog titles, which would definitely harm your articles and posts in search engines result pages.
This tutorial will help you to re-arrange your Header Widgets tags automatically by tweaking your themes or template HTML code. This simple and easy tweak will definitely turn your blog pages and posts to a more search engine friendly site for web crawlers and boost your blog on line presence.
Restructure your Blogger Themes and Templates H-Tags for Search Engines Best Results.
Automatically change your blog Header widget H-Tags
> Go to blogger.com > "Your Blog" > Dashboard > Template > Backup/Restore > (Pop Up Window) Save your existing templste to your PC.
> Go to Edit HTML > Proceed > Tick on Expand Widget Templates.
> Press Ctrl-F and copy the code below and paste to your search bar > press Enter.
<div class=titlewrapper><h1 class=title><b:include name=title/></h1></div>
> You will find a line of codes which would look similar to this:-
<div class=titlewrapper>
<h1 class=title>
<b:include name=title/>
</h1>
</div>
> Copy the code below and replace with the line of codes above > click Save.
<b:if cond=data:blog.url == data:blog.homepageUrl>
<div class=titlewrapper>
<h1 class=title>
<b:include name=title/>
</h1>
</div>
</b:if>
<b:if cond=data:blog.pageType == "item">
<div class=titlewrapper>
<h2 class=title>
<b:include name=title/>
</h2>
</div>
</b:if>
Explanation: What this does is to re-organise your Header widgets to automatically switch your Home page H1 (Blog Title) tags to H2 tags on your blog posts. And in the same event, on your blog Home Page, your blog post title snippets will be indicated as H2 tags, thus preventing from duplications of H1 tags on the home page it self.
Changing your Blog Posts Titles H-Tags
While still in Edit HTML window:-
> Press Ctrl-F and copy this code: h3 class=post-title entry-title - and paste to your search bar.
> Press Enter and you will find a similar line of codes like below:
<b:if cond=data:post.title>
<h3 class=post-title entry-title>
<b:if cond=data:post.link>
<a expr_href=data:post.link><data:post.title/></a>
<b:else/>
<b:if cond=data:post.url>
<a expr_href=data:post.url><data:post.title/></a>
<b:else/>
<data:post.title/>
</b:if>
</b:if>
</h3>
</b:if>
Note: Certain themes would have a slight difference coding depending on the template designers, but the above line of codes would be a good indicator.
> Now replace H3 code to H1 at the start and ending of the given line of codes.
> Click Save and Preview your Blog.
Explanation: What this does is to replace your blog posts H3 tags to H1 tags all through out your blog site, even for your previous and future posts and articles.
Your CSS Stylesheets
When changing your H1 to H2 tags vise versa, certain stylesheets of your standard blogger templates have some differences. Additonal code is required to synchronise the changes with the above tags; while still in Edit HTML window:-
> Press Ctrl-F and copy this code: ]]></b:skin> - and paste to your search bar. Press Enter.
> Copy code below and paste above the given code:-
h1.post-title, .post h1 #blog1 h1, #blog H1 {font-size:1.5em;}
> Click save and Preview. You can change the font height which suits your blogger template
Note: You can change your blog title sizes by adding the numbers in the code above, for instance 1.5em equals to 150% larger than your existing font size, and so forth.
Congratulations! You have successfully optimised your blog main header-tags. You can use free online tool such as SEO Site Tools to re-check if the steps above was successful. Just click the browser built SEO Site Tools here if youre using Google Chrome and install. Installation is pretty much straight forward and with a simple click on your browser, it can detect your blog H-Tags instantly.
But wait! How about the other H-Tags? What about optimising H2, H3 and the other header tags for your blog for full on page optimisation?
Dont worry, below are several links for you to optimise your blog pages H-Tags including basic optimisations techniques. If you have any quires, you can just leave a message below and we will gladly assist you. Note that we are +800 GMT, so time difference can be a slight factor for support, but never the issue. Shout out to Googlertech for the assistance and help for this tutorial.
Available link for download
Monday, December 26, 2016
Optimising Blogger Header H1 H2 H3 Tags For Better SEO SERPs
Optimising Blogger Header H1 H2 H3 Tags For Better SEO SERPs
 |
| Organise your blog pages H-Tags |
Here we are going to focus on the later H-tags for better on-page optimisations for your blog pages and posts. With re-structuring your blog header tags, it will make your blog more search engine friendly. Hence providing better on-line presence for your blog or site.
Standard blogger template and themes has H1 tags for blog titles, H2 header tags for blog post titles. For blog widgets - H3 tags and H4 tags for bookmarks links and comments and the lists goes on. To make it more clearly to search engines, we are going to change the relevance of the widgets to your blog post or pages.
The blog widgets installed is basically supporting features to your blog, so we want it to be read as secondary to your blog post/article contents by search engine crawlers. Thus, helping out your blog pages and posts contents to be more relevant to search engines.
The blog widgets installed is basically supporting features to your blog, so we want it to be read as secondary to your blog post/article contents by search engine crawlers. Thus, helping out your blog pages and posts contents to be more relevant to search engines.
Changing your Blogger Widgets H-Tags
This tutorial will be a manual installation and the amount of time spent will be based on how many widgets you have installed on your site. It is best to finish out your blog customisations before starting this tutorial.
> Go to blogger.com > "Your Blog" > Dashboard > Template > Backup/Restore > (Pop Up Window) Save your existing template to your PC. - Please remember doing this while editing your template.
> Go to Edit HTML > Proceed > Tick on Expand Widget Templates.
> Press Ctrl-F and copy this code: </b:widget id - paste to your search bar > press Enter.
> You will find various line of codes which would look similar to this:-
> Change the H2 code to H3 in the start and at the ending of the above line of codes. A sample would be looking like this:-
> Go to Edit HTML > Proceed > Tick on Expand Widget Templates.
> Press Ctrl-F and copy this code: </b:widget id - paste to your search bar > press Enter.
> You will find various line of codes which would look similar to this:-
<b:include name=quickedit/>
</b:includable>
</b:widget>
<b:widget id=PopularPosts1 locked=false title=Popular Articles type=PopularPosts>
<b:includable id=main>
<b:if cond=data:title><h2><data:title/></h2></b:if>
<div class=widget-content popular-posts>
<ul>
<b:loop values=data:posts var=post>
<li>
<b:if cond=data:showThumbnails == "false">
<b:if cond=data:showSnippets == "false">
<!-- (1) No snippet/thumbnail -->
<a expr_href=data:post.href><data:post.title/></a>
<b:else/>
Note: This is an excerpt code from the Popular Post widget.
<b:include name=quickedit/>
</b:includable>
</b:widget>
<b:widget id=PopularPosts1 locked=false title=Popular Articles type=PopularPosts>
<b:includable id=main>
<b:if cond=data:title><h3><data:title/></h3></b:if>
<div class=widget-content popular-posts>
<ul>
<b:loop values=data:posts var=post>
<li>
<b:if cond=data:showThumbnails == "false">
<b:if cond=data:showSnippets == "false">
<!-- (1) No snippet/thumbnail -->
<a expr_href=data:post.href><data:post.title/></a>
<b:else/>
Note: This is an excerpt code from the Popular Post widget.
> Now repeat the steps above for all your installed widgets. The length of codes will varies and just keep an eye for the start of the H2 code and the ending /H2 codes only. Change all of the header codes to H3.
Our advise, for every change, it is best to click the Save button and continue your search for your existing widget H2 header tags.
Our advise, for every change, it is best to click the Save button and continue your search for your existing widget H2 header tags.
Your CSS Stylesheets
When changing your H2 widgets H-tags, certain stylesheets of your standard blogger templates have some differences. Additional stylesheets code is required to synchronise the changes with the above tags; while still in Edit HTML window:-> Press Ctrl-F and copy this code: ]]></b:skin> - and paste to your search bar > Press Enter.
> Copy code below and paste above the given code:-
.post h3, #sidebar h3, #footer H3 .post-footer h3{font-size:1.2em}
> Click save and Preview. You can change the font size which suits your blogger template ie. 1.3em indicates 130% larger from your existing font size etc.
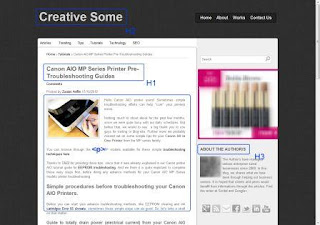
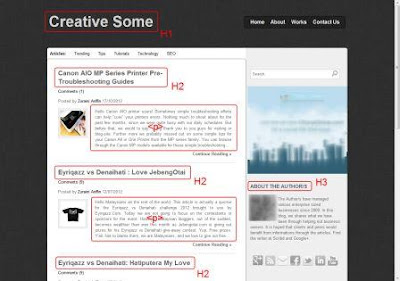
Now your blog pages and posts will have a re-structured layout for your on-page optimisations. A sample view will look something like the screen shot below.
 |
| Header tags basic layout for your Blog Home page (Static Page) |
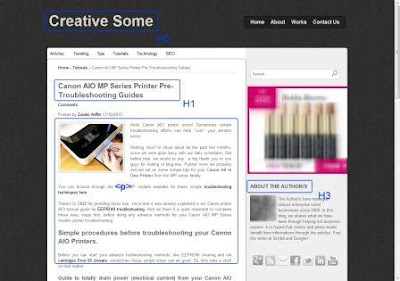 |
| Header tags basic layout for your Blog Post Pages. |
The images above is fairly a good indicator on how your basic header tags layout would be. You can see how the header tags switch through out your site, between your blog pages and your blog posts (marked red and blue). Use the browser built SEO Site Tools, for instance, to quickly check your header tags setting and layout.
With this basic knowledge, you can probably move forward to advance methods on taging other elements such as your anchored links and navigations. Switch the label H-tags which you feel needs the importance to search engine crawlers and you will be amazed on the outcome for your web pages in search engine results..
Available link for download
Subscribe to:
Comments (Atom)