Showing posts with label remote. Show all posts
Showing posts with label remote. Show all posts
Monday, February 13, 2017
Remote Komputer di Jaringan Lokal Teamviewer
Remote Komputer di Jaringan Lokal Teamviewer

Mungkin banyak sudah tau bagaimana cara meremote komputer jaringan lokal.
Windows sudah mempunyai bawaan bagaimana cara meremote jaringan lokal yaitu sebut saja aplikasinya Remote Desktop. namun aplikasi ini kurang populer sehingga kalah bersaing dengan Remote Desktop lainnya seperti OOVOO, TEAMVIEWER dll.
Berikut saya akan membandingkan berdasarkan riset/pengalaman selama memakai Remote Desktop Windows dengan Teamviewer :

Jadi apakah anda memakai Remote Desktop atau Teamviewer ya terserah anda.
Artikel ini akan membahas kelanjutan dari tutorial sebelumnya yaitu Remote Komputer Jarak Jauh Teamviewer.
Namun sesuai judul dan pertanyaan dari artikel sebelumnya maka saya akan langsung saja menjelaskan bagaimana caranya dengan memakai Teamviewer dan sekaligus akan saya jelaskan bagaimana memberi password sendiri serta Teamviewer sudah aktif setelah restart.
Langkah-langkahnya :
- Sebelum tahap selanjutnya baca dulu Remote Komputer Jarak Jauh Teamviewer.
- Pada PC B(yang diremote) buka Teamviewernya, Klik Extras - Options.
- Pada menu General, dibagian kanan pada kolom Display name beri nama sesuai keinginan. misal : PC B.
- Dibawahnya centang Start Teamviewer with Windows(agar saat restart/log off masih bisa diremote dengan kondisi masih terhubung jaringan lokal/internet).
- Maka akan muncul Configure Permanen Access, biarkan default jika password tidak ingin diganti sesuai keinginan bila diganti isi kolom Password dan Confirm Passwordnya. klik OK. Secara otomatis kotak tercentang juga pada Close to tray menu.
- Selanjutnya adalah tahap yang diinginkan yaitu pada Incoming LAN Connection ada beberapa pilihan yaitu :
- Deactived : Jaringan Lokal tidak berfungsi
- Accept : Jaringan Lokal dan Internet berfungsi
- Accept Exclusively : Hanya bisa Jaringan Lokal
- Maka akan secara otomatis yang sebelumnya Your ID angka acak sekarang menjadi IP Address komputer PC B. Namun password yang dirubah tidak akan tampil dilayar karena untuk menjaga kerahasiaan diluar. Serta tidak bisa diremote Jarak jauh / diluar Jaringan Lokal.
- Untuk Teamviewer PC A biarkan settingannya default karena yang penting adalah settingan komputer PC B yang diremote diubah.
- Pada PC A, isikan Partner ID dengan Your ID dari PC B yang berubah jadi IP Address. klik Connect Partner.
- Selamat anda sudah bisa Remote Komputer di Jaringan Lokal Teamviewer tanpa internet.


Tentu saja bisa. tapi dengan sedikit settingan kembali.
Tunggu tutorial selanjutnya ya. semoga bermanfaat.
Update baru tutorial untuk bagaimana cara cetak/print jarak jauh disini.
Available link for download
Wednesday, January 25, 2017
No Remote Desktop License Servers Available
No Remote Desktop License Servers Available
A client we were working with was having issues connecting to one of their servers. When trying to RDP to a Server 2008 R2 machine, they kept receiving this error message:

According to Microsoft’s Website, RDS and the License Server works like the following:The remote session was disconnected because there are no Remote Desktop License Servers available to provide a license.Please contact the server administrator.
In this case, we were receiving the error message because the 120 day grace period for the license server had ended. Even without the license server, Windows allows for 2 RDP sessions to the host machine. The problem was that RDP sessions were opened without being logged off, essentially filling the 2 RDP slots, and with the license server down, we couldn’t issue anymore.When a client—either a user or a device—connects to an RD Session Host server, the RD Session Host server determines if an RDS CAL is needed. The RD Session Host server then requests an RDS CAL from a Remote Desktop license server on behalf of the client attempting to connect to the RD Session Host server. If an appropriate RDS CAL is available from a license server, the RDS CAL is issued to the client, and the client is able to connect to the RD Session Host server.Although there is a licensing grace period during which no license server is required, after the grace period ends, clients must have a valid RDS CAL issued by a license server before they can log on to an RD Session Host server.
If you need more than 2 remote sessions to the server chances are you will need to purchase RDS Cals from Microsoft. However, in our case, they didn’t actually need Remote Desktop Services.
To fix the problem, it is easiest to do it directly from the host machine, however, if you don’t have access to the host machine, you could try RDPing with the admin command
Open a command prompt and type:
Obviously replacing IP-OR-HOSTNAME with the machine’s ..IP.. or.. Hostname…
To remove the Remote Desktop Services role:
Alternatively, if for some reason you can’t remove RDS, anytime you receive the message, you could log into the machine directly or through admin RDP and remove old RDP sessions:
That should clean out the old sessions and give you 2 sessions to use.
mstsc /v:IP-OR-HOSTNAME /admin
Obviously replacing IP-OR-HOSTNAME with the machine’s ..IP.. or.. Hostname…
To remove the Remote Desktop Services role:
- Click Start
- Type Server Manager and hit enter
- Click and Expand Roles
- Click Remove Roles
- Click Next
- Uncheck Remote Desktop Services
- Click Next
- Click Remove
- Click Close
- Click Yes to restart
- Wait for restart
- Connect to the machine again and allow the Role Removal to complete.
- There should be an OK or Finish button.
Alternatively, if for some reason you can’t remove RDS, anytime you receive the message, you could log into the machine directly or through admin RDP and remove old RDP sessions:
- Right click on the task bar
- Click Start Task Manager
- Click the Users tab
- Right click on the old RDP sessions (sessions not labeled as console) and click Log Off
That should clean out the old sessions and give you 2 sessions to use.
Available link for download
Monday, January 16, 2017
Remote Komputer Jarak Jauh Teamviewer
Remote Komputer Jarak Jauh Teamviewer
Anda mungkin sudah banyak bagaimana cara meremote komputer jarak jauh, namun kali ini saya akan bahas secara lengkap bagaimana cara meremote komputer jarak jauh.
Dengan meremote jarak jauh kita dapat memantau/memonitoring komputer dirumah kita, dikantor bahkan bisa juga disekolahan kita untuk kebutuhan tersendiri.
Remote Komputer Jarak Jauh ini juga mempunyai fungsi/kelebihan lain seperti :
- Mengajari orang lain dari jarak jauh atau lokal.
- Dapat memonitor komputer Server dikantor.
- Dapat memonitor jaringan kantor.
- Dapat mencetak dokumen jarak jauh.
- Dapat memantau CCTV dirumah/dikantor.
- Bisa juga menjadi sarana Video Call Gratis.
- Presentasi jarak jauh.
- Mengirim File jarak jauh tanpa email. dll

Mungkin sudah sebagian besar tidak asing dengan Teamviewer atau ya bila orang tidak pernah meremote pastinya tidak tahu soal Teamviewer.
Software Remote Teamviewer ini ada Free/Gratis ada yang berbayar. tetapi dengan yang free saja rasanya sudah cukup untuk hanya memakai monitor secara individu karena bila ingin memonitor jaringan banyak nanti akan kena pinalti dari teamviewer, dan wlau sudah install ulang tetap tidak bisa dipakai.
Berikut cara install dan pakai Teamviewer :
- Saya akan menggunakan Teamviewer v8 dimana menurutku lebih stabil download dulu disini. atau lebih baru bisa langsung download diwebsitenya Teamviewer.
- Buka hasil download sebelumnya (Teamviewer versi 8). dan install pada PC A.
- Pilih Install. Next.
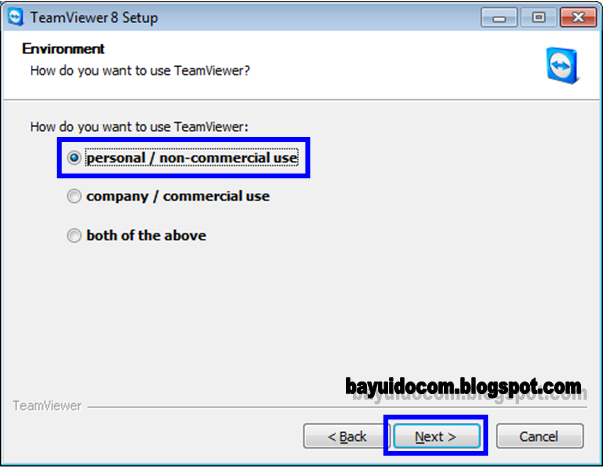
- Karena menggunakan versi gratis pilih saja "Personal / non-commersial use". Next.
- Pada tampilan License centang keduanya seperti gambar dibawah ini. Next.
- Pada pilihan type instalasi pilih saja "No(default)". Finish.
- Setelah proses install selesai klik Close. Maka akan membuka tampilan teamviewernya.
- Install juga pada PC B sama seperti cara sebelumnya.
- Untuk cara meremotenya cukup mudah,
Misal :- PC A ingin meremote PC B
- Catat Your ID dan Password Teamviewer PC B,
- Isikan ID tersebut ke Partner ID Teamviewer PC A dengan pilihan Remote Control dan klik Connect to Partner, isikan password Teamviewer B.
- Bila koneksi internet lancar maka akan secara otomatis layar komputer PC B akan berada di PC A.


- Selamat anda sudah berhasil cara install dan meremote komputer jarak jauh dengan Teamviewer.


Your ID : Nomor acak yang akan dipakai untuk remote di perangkat lain.
Password : huruf/angka yang digunakan saat remote komputer.
Partner ID : Nomor acak dari komputer yang akan diremote.
- Agar bisa diremote jarak jauh harus ada internet dan mendapatkan angka acak Your ID.
- Yang diremote versinya harus sama atau dibawah 1 level misal PC A Teamviewer v8 jadi PC B yang diremote harus Teamviewer v6-8(pengalaman penulis).
Semoga artikel bermanfaat bagi anda.
Bisa gak Teamviewer ini dibuat remote lokal saja tanpa akses internet?
Tentu bisa tapi tunggu saja tutorial selanjutnya ya. :D
Available link for download
Saturday, October 29, 2016
Remote Mikrotik Jarak Jauh dengan Internet IP PUBLIC
Remote Mikrotik Jarak Jauh dengan Internet IP PUBLIC
Berikut saya jelaskan bagaimana cara remote mikrotik dari internet, ketika sedang dirumah asyik-asyik maen game tau-tau dapat telpon laporan kalo ada problem jaringan dikantor, atau orang kantor minta dibatasi internetnya, atau anda punya warnet jadi bisa pantau dari gadget anda/laptop anda dirumah.
Berikut ulasan beberapa yang cukup efektif dalam memantau jaringan mikrotik anda jarak jauh.
Syarat Utama :
- Wajib ada koneksi Internet keduanya. baca Setting Speedy Dengan Mikrotik.
- Harus ada IP PUBLIC yang akan diremote dan kalau bisa IP PUBLIC tersebut type IP STATIS (Dialup modem cek di status, Dial up di Mikrotik cek di address list)
Dial up Speedy di Modem
Dial speedy di modem, mikrotik hanya untuk mengatur saja, IP Publik speedy akan didapat ketika koneksi terhubung ke internet. Berikut caranya :
Masuk modem, kemudian masuk Advanced Setup >> NAT >> Virtual server Set port forward pada modem (Modem TP LINK)
Rule Index : 1
Application : Mikrotik
Protocol : ALL
Start Port Number : 80
End Port Number : 8291
Local IP Address : 192.168.101.1 ( Isi dengan IP Address Mikrotik yang konek ke Modem ADSL).

Untuk Modem Linksys
Klik Applications & Gaming, isi Port Range
Application : Mikrotik
Start Port Number : 80
End Port Number : 8291
Protocol : Both
Enable : Centang
IP Address : 192.168.101.1 ( Isi dengan IP Address Mikrotik yang konek ke Modem ADSL)

Coba remote melalui internet pakai winbox, masukkan ip publik, username dan password mikrotik.

Bila tidak bisa coba cek Status modem apakah IP PUBLIC sudah muncul bila sudah selamat anda berhasil remote mikrotik via internet jarak jauh

Dial up Speedy di Mikrotik
Modem ADSL Brigde Mode artinya modem speedy hanya sebagai jembatannya lalu lintasnya tetapi PC Mikrotik Router sebagai dialnya dan mendapatkan IP PUBLIC.
Untuk melihat IP PUBLIC di mikrotik pakai winbox, buka menu IP – Addresses.
Berikut langkah-langkahnya :
Setting port forward di Mikrotik yang akan diremote
Masuk winbox, buka menu IP > Firewall > NAT
Buat Destination NAT
Menu tab General
Chain : dstnat
Dst. Address : IP Publik ISP
Protocol : 6 (tcp)
Dst Port : 8291

Menu tab Action
Action : dst-nat
To Addreses : 192.168.101.1 ( IP Address Lokal Mikrotik)
To Ports : 8291

Buat Source NAT
Menu tab General
Chain : srcnat
Src. Address : 192.168.101.0/24
Dst. Address : 192.168.101.1 (IP Lokal Mikrotik)
Protocol : 6 (tcp)
Any Port : kosongi
Out. Interface : Ether3-LAN (Interface yang mengarah ke jaringan lokal)

Menu tab Action
Action : masquerade

Akhirnya selesai juga, hehehe gampang bukan???
Kalau yang sudah bisa nanti akan bilang "Oohh gitu caranya... oalah mek ngene tok... owh ngunu ta..." :D
Terima kasih telah berkunjung diblog saya.
Mohon komentarnya ya, bila yang masih bingung bisa langsung komen mawon.
JUAL BUKU YASIN DAN UNDANGAN MURAH MERIAH
klik aja Bisnis Pemuda Surabaya
Available link for download
Subscribe to:
Posts (Atom)