Wednesday, March 22, 2017
Reset the ink level for Canon MX308
Reset the ink level for Canon MX308
Misalnya kamu ingin membuat menu Depan, Tentang, dan Portofolio. maka kamu harus membuat postingan dengan Judul/Title: Depan, Tentang, dan Portofolio, dengan demikian kita akan mempunya 3 halaman dengan url http://nama.blogspot.com/depan.html, http://nama.blogspot.com/tentang.html dan http://nama.blogspot.com/portofolio.html.
Selanjutnya ikuti langkah-langkah pembuatan menu secara otomatis menggunakan List-O-Matic. Setelah semua langkah di lakukan, kamu akan di beri 2 jenis kode yaitu HTML dan CSS.
Here is the CSS for this list:
#navlist ul
{
margin-left: 0;
padding-left: 0;
white-space: nowrap;
}
#navlist li
{
display: inline;
list-style-type: none;
}
#navlist a { padding: 3px 10px; }
#navlist a:link, #navlist a:visited
{
color: #fff;
background-color: #036;
text-decoration: none;
}
#navlist a:hover
{
color: #fff;
background-color: #369;
text-decoration: none;
}
Sedangkan untuk kode CSS harus di copy dan di letakkan dalam kode template. Di halaman template blog kamu, pilih Edit HTML, letakkan kode CSS dari List-O-Matic tadi sebelum kode ]]> dan save template.
Selamat Mencoba !
Available link for download

Monday, March 20, 2017
Resetter Canon iP2770 Printer Free Download
Resetter Canon iP2770 Printer Free Download
 |
| Canon iP2770 |
Resetter Canon iP2770 Printer Free Download
This is how to reset Canon iP277
- Turn On your printer until you see Error Eo8 comes up, and you also see "The Ink Absorber is Almost Full" on your monitor.
- Prepare Resetter Canon Service Tool v3400 (can be downloaded by clicking the download link below)
- Make your printer in Service Mode. This is how to do it:
- Turn of the Error Printer by pushing POWER button, do not unplug the Power Cable
- Press and hold the STOP/RESET button together with POWER button
- Release STOP/RESET button but do not release POWER button
- While you are still pressing the POWER Button, Press STOP/RESET 6 times
- then release both of button (STOP/RESET and POWER Buttons) at the same time, then your printer will be in the Service Mode
- The computer will detect a new device/hardware, ignore it
- Then extract and run the Resetter Canon Service Tool v3400
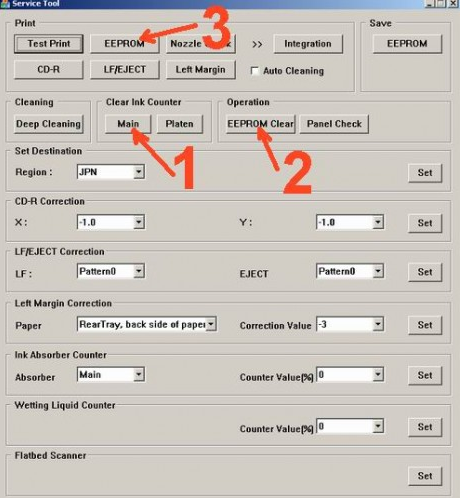
- In the menu absorber clear ink counter Choose Main then click SET in the right side.
- In the menu ink absorber counter choose Main then click SET in the right side.
- Then click EEOPROM. then a printer will print a page.
- Youre done. the printer will works well.
Resetter Canon iP277 Free Download link
Available link for download
Resetter canon 1980 1880 iP2500 iP1900 iP1100 iP1800
Resetter canon 1980 1880 iP2500 iP1900 iP1100 iP1800
“The Ink Absorber is Full
Contact The service Center”.
-->
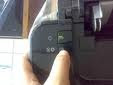
- Press and hold power button with your finger and then take in power cable
- Hold power button, then press resume button with your middle finger twice.
- Let in power button
- Printer doesnot blinking any more.
- At this step you had done Manual Reset Step and printer could be use again.
- But if manually your printer still error, you should use Reset Software permanently
- Download software tool
- Extract file ZIP.
- Do GeneralTool.exe
- At
USB Port - Click Lock Release button
- Choose (check) EEPROM CLEAR
- Take blank paper to print. Then click Test Pattern 1 button
- Finish and your Printer will be normally
The methodes : here
Available link for download
RESET PRINTER CANON IP 1880 MENGGUNAKAN GENERAL TOOL
RESET PRINTER CANON IP 1880 MENGGUNAKAN GENERAL TOOL
- Hidupkan printer canon pixma iP1800
- Printer dalam keadaan hidup, lepaskan kabel power printer
- Ketika printer sudah off/mati tekan dan tahan tombol power lalu pasang kembali kabel power printer.
- Tombol power masih tetap ditekan dan ditahan, kemudian tekan tombol resume 2 kali
- Lepaskan tombol power
- Secara otomatis printer canon IP1800 akan terinstal kembali dan tunggu saja sampai proses instalasi selesai.
- Setelah proses installasi selesai, masuk ke control panel=>Printer and Faxes (Windows XP) atau control panel=>Devices anda Printers, secara otomatis driver printer Canon IP1800 akan bertambah yaitu canon ip1800 (Copy 1). Driver ini yang aktif, silahkan jika ingin dijadikan default printer.
- Kemudian lakukan test print.

- Download software general tool disini atau di halaman download
- Buka dan jalankan software General Tool.exe yang sudah anda download
- Pilih USB Port, klik dan akan muncul pilihan (misal usb001)
- Centang EEPROM Clear
- Klik Lock Release, maka set destination akan aktif
- Klik iP1880 pada set destination
- Pada menu Clear Waste Ink Counter klik Main, lampu hijau akan berkedip 1 kali
- Klik Platen, lampu hijau akan mberkedip 1 kali
- Klik Quit untuk keluar dari program.
- Matikan printer, cabut power, pasang power dan nyalakan printer. Jika normal, printer akan menyala tanpa blinking.
Bagi yang belum punya driver printer canon ip 1880, klik disini untuk download.
Available link for download
Sunday, March 19, 2017
Reset Canon Xnu i255 dan I350 i355
Reset Canon Xnu i255 dan I350 i355
INDIKASI “WASTE FULL ERROR”
Lampu warna orange dan hijau hidup secara bergantian sebanyak 7 kali dengan spasi warna hijau, mengindikasikan bahwa waste counter sudah lebih dari 100%, ini adalah kondisi terakhir setelah peringatan operator call error dengan kode lampu orange berkedip tanpa diselingi warna hijau sebanyak 8 kali.
SERVICE MODE
Dalam keadaan error maka printer dalam kondisi sibuk dan tidak siap dilakukan inspeksi, langkah awal untuk inspeksi diharuskan memasukkan printer pada mode service dengan cara sebagai berikut:
1. Dalam kondisi printer mati dengan printhead catridge terpasang, pada saat power off (tanpa listrik) tekan dan tahan tombol power (sebelah kiri) kemudian berikan power (masukkan kabel listrik).
2. Dalam kondisi tombol power masih tertekan, tekanlah tombol resume (sebelah kanan) 2 kali, kemudian lepaskan tombol power, dan tunggulah beberapa saat setelah lampu tidak berkedip.
3. Setelah lampu tidak mengindikasikan adanya error berarti printer siap untuk diinspeksi, apabila masih ada indikasi error lain silahkan cek apakah printhead cartridge sudah terpasang, atau cobalah cek indikasi kode error tersebut.
EEPROM RESET
1. Silahkan pilih nomor port USB dari printer yang akan direset, perlu diperhatikan bahwa programGeneralTool tidak dapat digunakan apabila nomor port melebihi batas tertentu (20 port), apabila port USB sudah melebihi batas cobalah untuk menghapus printer-printer yang ada dan lakukan restart pada komputer, apabila port belum terhapus silahkan hilangkan melalui root didalam registry Windows.
2. Apabila diperlukan inisialisasi tipe printer tekanlah tombol didalam kotak "SET DESTINATION", inisialisasi ini diperlukan apabila terjadi kesalahan tipe printer dimana tipe printer tidak sesuai dengan daerah pemasaran (market area) atau tidak sesuai dengan kondisi asli (lihat tipe printer yang tertera di cover printer), silahkan cek tipe printer dengan menekan tombol "DEVICE ID" didalam kotak "GET DEVICE ID".
3. Berikan tanda cek pada pilihan "EEPROM CLEAR", selanjutnya lakukan test pattern dengan menekan tombol "TEST PATTERN 1" atau "TEST PATTERN 2", dimana "TEST PATERN 1" akan memberikan printout data EEPROM dan melakukan test prinhead untuk semua nozzle (hitam dan warna), "TEST PATTERN 2" akan memberikan printout data EEPROM dan melakukan test printhead untuk nozzle hitam.
4. Matikan printer dan cabutlah kabel listrik, tunggu beberapa saat untuk memastikan printer benar-benar mati. Siapkan tank berisi tinta penuh dan selanjutnya hidupkan kembali printer dan tunggu beberapa saat setelah proses printhead cleaning selesai (tahap printhead cleaning pertama) dan lampu hijau tidak berkedip. Silahkan cek nilai waste counter dengan menekan tombol "EEP-ROM INFORMATION", pastikan nilai waste counter (nilai D) tidak melebihi 10%.
5. Matikan printer, tunggu beberapa saat dan hidupkan kembali printer. Selanjutnya printer akan masuk pada tahap printhead cleaning kedua. Silahkan lakukan test pattern untuk menampilkan printout data EEPROM (tanpa "CLEAR EEPROM") dan juga cobalah lakukan "Test Print Page" yang sudah disediakan oleh Windows melalui properties dari printer bersangkutan.
REFERENSI
Operator Call Error (Lampu orange berkedip tanpa diselingi lampu hijau), disediakan untuk user.
KODE ERROR INDIKASI/RESOLUSI
Blinking 2 Times Paper out (tidak ada kertas).
Blinking 3 Times Paper jam (kertas macet), apabila berkelanjutan cobalah cek sensor
kertas berupa tuas (warna hitam) mengubungkan kertas dengan photo
sensor pada PCB.
Blinking 6 Times No cartridge installed (tidak ada printhead cartridge), apabila
berkelanjutan cobalah cek terminal yang menghubungkan printhead
cartridge dengan carriage, atau cek kondisi kabel ribbon.
Blinking 7 Times Cartridge installed improperly (printhead cartridge terpasang tidak
benar), kemungkinan dikarenakan prinhead cartridge salah atau terjadi
kerusakan pada EEPROM printhead cartridge).
Blinking 8 Times Waste ink full warning (peringatan sebelum error nilai waste counter
melebihi 100%).
Sofware reset :General Tools software
Cara reset : Manual Reset
Available link for download
Review Printer Canon PIXMA Ink Efficient E500
Review Printer Canon PIXMA Ink Efficient E500
 Meski memanfaatkan hanya 2 jenis tinta, kemampuan cetak fotonya bisa diandalkan. Canon mengadopsi teknologi andalannya,
(day)
| Kecepatan Cetak | 5 lembar | FPOT (1 lembar) |
| Teks Mono (rtf) | 74 detik | 18 detik |
| Teks Warna (rtf) | 121 detik | 27 detik |
| Teks+Grafik (pdf) | 162 detik | 37 detik |
| Gambar A4 (jpg) | 284 detik | 70 detik |
| Kecepatan Copy | ||
| Teks Mono (rtf) | 75 detik | 25 detik |
| Teks Warna (rtf) | 185 detik | 45 detik |
| Teks+Grafik (pdf) | 298 detik | 56 detik |
| Gambar (jpg) | 315 detik | 68 detik |
| Kecepatan Scan | ||
| Foto A4 (rendah) | - | 19 detik |
| Foto A4 (standar) | - | 20 detik |
| Foto A4 (tinggi) | - | 20 detik |
| Sebagai Printer | |
| Teknologi Cetak | Inkjet warna (FINE) |
| Resolusi Maksimum | 4800 x 1200 dpi |
| Kapasitas Kertas | 80 lembar |
| Jenis Kertas | Kertas (biasa, inkjet, foto), amplop, transparan, label, kartu |
| Sebagai Scanner | |
| Teknologi | Flatbed CIS |
| Resolusi Optik/ Interpolasi | 1200 x 2400/19200 x 19200 dpi |
| Kedalaman Warna | 24bit |
| Sebagai Copier | |
| Pengecilan/Perbesaran | - |
| Resolusi Maksimal | 600×600 dpi |
| Multiple Copy | Maksimal 20 halaman |
| Umum | |
| Koneksi | USB 2.0 |
| Dukungan Kartu Memori | - |
| Sistem Operasi | Windows XP SP2/Vista SP1/7, Mac OS X v10.4 ke atas |
| Konsumsi Listrik | 12/0,7/- W (aktif/standby/off) |
| Dimensi (plt) | 44,9 x 30,4 x 15,2 cm |
| Bobot | 5,3kg |
| Situs web | http://www.canon.co.id/home |
| Garansi | 1 Tahun |
| Harga* | Rp1.025.000 |
Available link for download
Saturday, March 18, 2017
Resetter Canon PIXMA MP237
Resetter Canon PIXMA MP237
Canon PIXMA MP237 merupakan printer multi fungsi murah yang bisa melakukan 3 hal sekaligus dalam 1 printer yaitu print, scan, copy. Keberadaan printer multi fungsi dengan harga murah menjadi daya tarik calon pembeli. Dengan 3 fitur dalam 1 perangakat dan berharga cukup terjangkau menjadikan printer ini banyak menjadi pilihan pengguna printer.
Karena banyak yang menggunakan printer Canon MP237, disini saya melihat akan banyak yang membutuhkan resetter MP237 saat mengalami error. Apa fungsi resetter? resetter berfungsi untuk mereset ulang chip yang tertanam pada printer, dimana chip tersebut akan mencatat setiap printer melakukan pencetakan. Ketika chip tersebut mendeteksi jumlah maksimal pencetakan telah tercapai, maka printer akan melakukan blinking dan Canon MP 237 anda tidak bisa digunakan lagi untuk mencetak, disinilah kita membutuhkan resetter MP237.
Cara Reset Canon MP237
- Tahap Menjadikan Printer MP237 Ke Service Mode
Seperti biasa, untuk bisa suskses mereset canon MP237, langkah awalnya adalah kita harus menjadikan printer canon menjadi service mode. Dengan kondisi Service Mode kita bisa melakukan reset terhadap si printer dan berikut ini langkah-langkahnya.- Jika printer dalam keadaan hidup, matikan printer dengan menekan tombol power
- Setelah printer mati, tekan dan tahan tombol STOP/RESET menggunakanakan salah satu jari tangan anda diikuti dengan menekan Tombol POWER (kedua tombol pada posisi tertekan)
- Lepaskan jari yang menekan tombol STOP/RESET tapi tombol power harus terus anda tekan
- Pada posisi tombol POWER masih tertekan, gunakan jari tangan yang lain untuk menekan tombol STOP/RESET sebanyak 6 kali. Setelah anda menekan tombol STOP/RESET 6 kali, lepaskan kedua tombol secara bersamaan.
- Jika anda benar melakukan tahap di atas untuk mereset MP237, seharusnya komputer anda mendeteksi adanya device baru, abaikan saja, karena itu menjadi tanda bahwa anda telah berhasil menjadikan Canon MP237 anda ke Service Mode.
- Tahap Reset Printer Canon MP 237
- Download Resetter Canon MP237 DISINI
- Extract dan jalankan reseter MP237 dengan meng klik 2 kali file Service tool v3400.exe
- Mulailah lakukan memerintah software reseter MP237
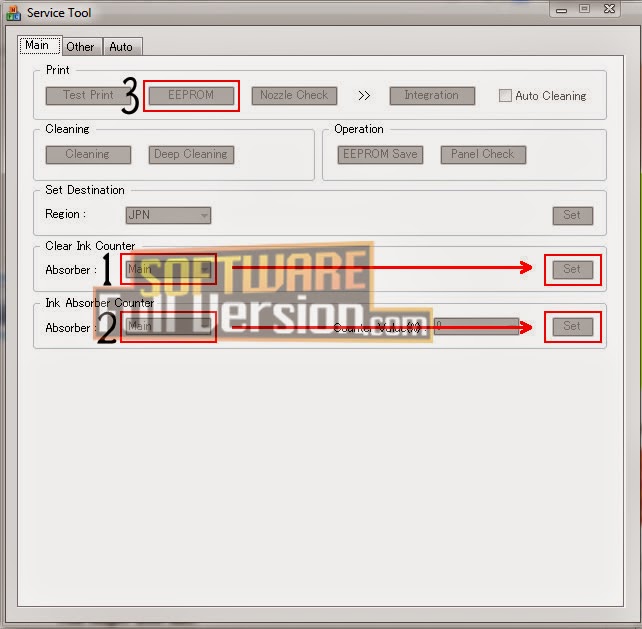
- Sub Tab Clear Ink Counter pilih Main
- Sub Tab Ink Absorber Counter pilih Main
- Klik EEPROM maka printer akan mencetak selembar kertas
- Matikan printer dan hidupkan kembali maka printer sudah bisa anda gunakan kembali
SEMOGA BERMANFAAT.
Available link for download
Wednesday, March 15, 2017
Reset printer Canon BJC 2000 BJC 2100
Reset printer Canon BJC 2000 BJC 2100
Dear all reseters
Reset Waste Ink Canon
1. Remove the Cartridge
2. Unplug the AC Power Cord
3. Close Front access panel
4. Hold down the RESUME/RESET button and plug in the AC power cord
5. Release RESUME/RESET after plugging in the AC Power cord.
6. Press the RESUME/RESET once within
7. Seconds and release the RESUME/RESET .
8. Press and HOLD RESUME/RESET for two seconds or more and release it.
9. Press and HOLD RESUME/RESET for two seconds or more and release it.
10.Unplug AC Power Cord to set data.
Available link for download
Tuesday, March 14, 2017
Reset Blinking canon iP4000
Reset Blinking canon iP4000

step by step to resetting waste ink counter printer canon iP4000
1. With the printer plugged in and powered off, press and hold the
Resume/Cancel button, then press and hold the Power button.
Do not release the buttons. The LED light should be green to
indicate that a function is selectable
2. While holding the Power button, release the Resume/Cancel button,
do not release the Power button
3. While holding the Power button, press the Resume/Cancel button 2 times,
and then release both the Power and Resume/Cancel buttons. Each time the
Resume/Cancel button is pressed, the LED lights alternately in orange and
green, starting with orange.
4. When the LED light is green, press the Resume/Cancel button 4 times. Each
time the Resume/Cancel button is pressed, the LED lights alternately in
orange and green, starting with orange.
5. Press the Power button. The LED lights in green, and the reset is performed.
When the operation completes, the printer returns to the menu selection
mode automatically
6. Press the power button to exit service mode.
Available link for download
Sunday, March 12, 2017
Reset Ink Level pada Canon MP150
Reset Ink Level pada Canon MP150

1) With the printer powered off but connected to a power source, press the Power button while pressing and holding the Stop/ Reset button.
2) When the Power is lit, press the Stop/Reset button two times while pressing and holding the Power button.
3) When releasing the Power button and the Stop / Reset button (regardless of order), the printer will move into a service mode. (Waiting for menu selection)
4) When the on/off lights in green, press the Stop/Reset button the specified number of time(s) according to the
function listed in the table below.(Each time the Stop/Reset button is pressed, the LED lights alternately in
orange and green, starting with orange.)note: press 4 times for waste ink counter reset.
The number of the Reset button pressing
LED Function Remarks
0 time Green Power off
1 time Orange Service pattern print
2 times Green EEPROM print
3 times Orange EEPROM reset
4 times Green Waste ink counter reset
5 Turn off the printer.( it must be turn off)and then turn it on again.
Available link for download
Saturday, March 11, 2017
RESET WASTE INK TANK CANON
RESET WASTE INK TANK CANON
For seri i250, i255, i350, i355, PIXUS 350i
indicates :
WASTE INK TANK Full, printer has no respon
The Solutions :
1. Download i320 Service Tool or 350,355,250,255 Service Tool
2. Do service mode procedure to printer, the methods are ::
- Turn off printer, Take off USB cabel dan power cabel
- Push and hold POWER button, take on power, Turn on printer
- Indikator LED will be in green colour
- Push and let RESUME button, indicator LED will be in yellow colour
- Push and let RESUME button once more, indicator LED will be in green colour
- Let POWER button
This time printer in MODE SERVICE
Reset Manual i255-i355.pdf
ManualReset_i320.pdf
3. Do reset waste ink tank procedure with :
4. take on USB cabel
5. Do program General Tool
6. The Figure will be like this :
7. Choose the parameter no 1
8. Put on no 2 according to printer canon, DON”T BE WRONG!!!
9.Congratulation… printer has been in Reset.
Available link for download
Friday, March 10, 2017
 Download
Thursday, March 9, 2017
Reset Canon iP1200 dan IP1600 2200
Reset Canon iP1200 dan IP1600 2200

The methods to Reset Ink Tank Full Error Canon IP1200 and First step (Reset Hardware)
1. Turn off printer, then take out power cable.
2. Press and hold Power button (use your finger to hold power button).
3. Taken in Power cable.
4. Use middle finger to press Resume button twice.
5. let your finger from Power button.
6. You finished First step to reset Ink Tank Full Error ( power lamp blinking).
Second step (Reset Software) be Permanent.
1. Download IP1200 & 1600 Resetter here
2. Ekstract / Unrar di folder C:IP1200
3. Make sure the utility of all file free from from Read Only.
4. Do GeneralTool.exe
5. In USB Port choose your Port printer.
6. Choose (check) EEPROM CLEAR
7. Supply blank paper to print.
Then click Test Pattern 1 button
8. Finish. Your Printer IP1200 and IP1600 be normally
Manual Reset canon IP1200 1600 2200 Download
Available link for download
Wednesday, March 8, 2017
Resetter Canon IP 3300 inkjet Printer
Resetter Canon IP 3300 inkjet Printer
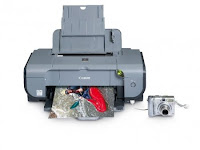 Try to enter service mode and reset EEPROM:
1. Turn printer OFF
2. Hold down RESUME and then hold down POWER
3. release RESUME
4. press RESUME twice, then release POWER
5. Let green light blink until printer is done moving print head.
Now you should be in service mode.
6. Press RESUME once then POWER to execute
This will print head test print. Just if you want to check clogging problems in depth.
7.Press RESUME twice then POWER to execute
This will print EEPROM information ink usage etc.
8. Press RESUME three times then POWER to execute
This will reinitialize (reset) EEPROM
9. Press RESUME twice then POWER to execute
This will print EEPROM information once more, you should compare it with your fist print. All zeroes should be all over the place.
That means your EEPROM is reset.Download the complete
user guide
Available link for download
Saturday, March 4, 2017
Reset Waste Ink Printer Canon S Series
Reset Waste Ink Printer Canon S Series
2. Press and hold the RESUME button, then press and hold the POWER button.
3. Release the RESUME button, Next press and release the RESUME button
two(2) more times in succession. Note: you are still holding the POWER
button). The printer’s carriage will “reset” or move momentarily. If the above
was properly performed the printer will enter the “Service Mode”.
4. Press the RESUME button 4 times, this will select the clear waste ink counter
function. The lamp will alternate (change) color with each key press.
After selecting the desired mode (eg 4), press the POWER button to “set” the
change, and return to the top of the function selection menu. Press the POWER
button again to restart the printer.
Reset Waste Ink Canon Pixma MP110
Here this step by step to resetting waste ink counter printer Canon Pixma MP110
1. You will include printer.
2. press button Menu, then Scan, Copy and again Scan. All - entered into the service
regime. 3. Select Counter.
3. Press button Copy - all Pampers is discarded into zero.
4. You will turn off printer by button POWER.
Reset Waste Ink Canon Pixma MP450
Here this step by step to resetting waste ink counter printer Canon Pixma MP450
1. You will turn off printer.
2. retaining button Resume/Cancel (red triangle in the circle) press button POWER -
indicator it will catch fire by green color.
3. you will let go button Resume/Cancel, continuing to retain POWER.
4. press button Resume/Cancel of 2 times, retaining POWER, after which you will let
go all buttons.
5. when indicator will be lit BY GREEN - press button Resume/Cancel of 4 times!
6. you will turn off printer by button POWER.
Available link for download